Showing posts with label felt. Show all posts

Saturday, 4 January 2014

DIY: Grumpy Cat Christmas Sweater

For most, Christmas is a joyful season, filled with, I don't know, joyful stuff. However, for others, Christmas carols and flashing fairy lights fast become hard to tolerate, with fruitcake leaving only a sour taste in one's mouth. If you're one of the latter, spread your disdain for the season by coming as close to Christmas spirit as you dare and donning a traditionally ugly Christmas sweater, featuring the face of the internet's beloved Grumpy Cat. Perfect for glaring at Mariah Carey-blaring speakers in.

What you'll need:
  • Felt in Grumpy Cat-esque shades (cream, dark brown, white, light blue, and a tiny scrap of pink)
  • A small scrap of white fleece
  • An old sweater that you're willing to sacrifice for your hatred of the season
What to do:

  1. Cut out the basic shape of the face from cream felt and the shape of the eye patches from brown felt. Sew the eye patches onto the face.
  2. Cut out the muzzle area from white felt and stitch it onto the face.
  3. Cut out the nose from pink felt. Attach onto muzzle.
  4. Cut out two eyes from light blue felt and stitch onto the face.
  5. Stitch on two black felt pupils and stitch a grumpy mouth with pink cotton.
  6. Cut out an ear from brown felt and stitch it onto the head.

  7. Cut out a red hat shape and stitch it onto the other side of the head. Add an extra flap to the top of the hat to create the point.
  8. Stitch on a strip of white fleece to the bottom of the Santa hat.
  9. Cut out a circle of white fleece and sew tacking stitches around the edge.
  10. Pull the tacking stitches tight to create a more spherical shape.
  11. Attach to point of Santa hat.
  12. Sew your Grumpy Cat onto your old sweater and spread the disdain for the season!


As usual, this project is also posted over on Cut Out + Keep.

Hope you've all had a fun festive season, and expect a few more Christmassy crafts over the next few days - starting the 2014 decorating early, remember? Nothing to do with my laziness about posting. Nothing at all. *mumbles*

LDP x

Sunday, 29 September 2013

Mercat Brooch

A few months ago, I was browsing through the blog Tails of a Mermaid. Run by Natalie Roos, a fellow South African, it is testament to Natalie's obsessive love of good food, exciting lifestyles and, above all: cats.

As usual, The Muses tend to strike from the strangest of places, and I couldn't avoid the temptation to create something combining the title of her blog with her ailurophilia. And thus, the mercat brooch was born.


Here's how to make your own:

What you'll need:

  • Felt (scraps will be enough)
  • Acrylic and fabric paint
  • Brooch pin
What to do:


  1. Cut out two of your cat shapes and two of your tail shapes. I didn't make a pattern for this, as it's very simple - just cut out the basic outlines.
  2. Start painting your felt pieces. Be sure to concentrate more on the front, as the back won't be seen. Add the face detail to the cat body piece, and consider using metallic paint for the tail (I mixed light blue, light green and silver paint to get the colour for my tail).
  3. Add some glue to stick together the cat body piece and the tail piece. Repeat with back pieces. Add a line of small stitches to secure.
  4. Add a button (I used a starfish-shaped one) and some paws. Glue on, and secure with a few stitches.
  5. Attach the brooch pin to the back piece of the cat.
  6. Attach the two pieces together, using cotton that matches the pieces.

I mailed off this little kitty to Natalie as an early birthday present in July, and I think she liked it, which was a wonderful feeling. Somehow, giving away the things I make to people who appreciate them is a far better feeling than keeping them hoarded up in my cupboard back at home.


This project is also available over on Cut Out + Keep. 
I'd love to see your version of this project if you give it a go, so be sure to comment if you make one. :) 

Thanks for reading, and apologies for my irresponsible hiatus. 
LDP x


Friday, 19 July 2013

Sheldon the Dinosaur Plush DIY

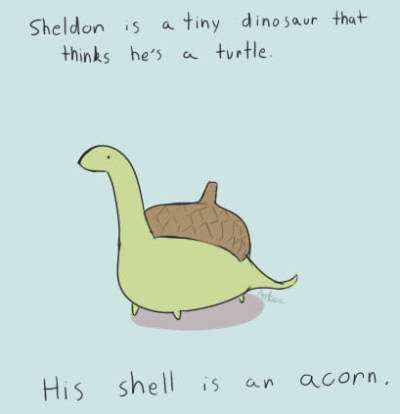
For about a year now, my friends and I have adored the Sheldon the Dinosaur comic by Amburgered. Sheldon is a tiny dinosaur who thinks that he is a turtle, and uses an acorn for a shell. Whenever I know one of my very close friends, Abi, is feeling down, I make a point of finding a recent Sheldon comic and sending it to her to cheer her up.

I decided that, because of this love Abi and I share for Sheldon, I ought to make Abi a little Sheldon of her own.

If you want to make your own, here's how to do it:
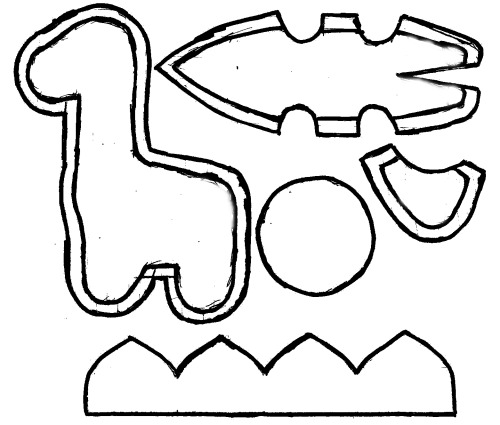
  1. Download the pattern here.
  2. Sew your four leg pieces to the leg holes on the inside body.
  3. Sew the dart at the back of the inside body.
  4. Sew the two outside body pieces to either side of the inside body piece.
  5. Sew around the neck and head area and at the back, bottom area, making sure to leave a space for turning and stuffing.
  6. Turn the body right-side out. Put the safety eyes in on the face and stuff. Close your stuffing hole.
  7. Cut out your upper shell pattern.
  8. Hand-stitch your shell (right sides together) as close to the edge as possible. Add in a small scrap of felt in the centre of the shell as the acorn stalk.
  9. Stitch the upper shell to the shell base and stuff it.
  10. Paint small Xs onto the shell.
  11. Stitch the complete shell to the back of the body.
  12. Take your own little Sheldon on adventures with you! 


I'd love to know if you also read the Sheldon comics, or see if you make a Sheldon of your own, so please leave your comments below!


Thanks for reading!
LDP x


Friday, 29 March 2013

Sock Sloth

I can't be certain why, but recently, I've been slightly besotted with sloths. I don't know when or how this started, but seriously, have you seen how cute baby sloths are?! (Spoiler alert: they're really freakin' cute).


One of the first noted occasions that this obsession showed its prominence was when I found this picture:

I don't even know where I found this, so I don't know to whom I ought to credit it.
Blame the internet.
After I'd finished making my "Thrift Sloth" jokes, I happened to be looking around the Sock Dreams website for some inspiration for the sock-craft contest that Cut Out + Keep is currently running, when I stumbled across these:

Look at them! Just look at them! They are incredible! Exclamation mark!
Also, you can find them here.
These gave me some much-needed inspiration for a contest entry. I would make a sock sloth!


(I also wrote a tutorial on how to make your own, so keep reading for that.)

Wednesday, 27 March 2013

Moustachioed Goat

Over my last six weeks at university, I have been watching a lot of the show Community. And by "a lot", I mean unhealthy dosage a lot. Now, for those of you who don't know the show, the second episode of the first season ends with two of the main characters rapping in Spanish. I can guarantee that if you haven't seen it, you cannot possibly conceive how incredibly awesome it is. Therefore, if you haven't seen it, you should watch it here. And if you have seen it, then I've no doubt you'll watch it anyway.


Now, because of this Community-obsessed state in which I've been wallowing, I, naturally, took it upon myself to make something Community-related. This is a bit difficult, considering that the show has actors rather than animated characters which would be easier to convert into crafts. So, I made a goat with a moustache.

Unfortunately Cameron Diaz was unavailable, so I made his moustache out of felt, just like the rest of his body.

It was pretty simple to make this cute little guy, but if you'd like to make your own, you can find a full tutorial, as usual, over on Cut Out + Keep.

In other university-related news, I essentially abandoned my photography project thanks to a to-do list constantly clawing at my sanity. I'm now at home for vac, and I'm only returning to Grahamstown next Sunday, so I'm enjoying some crafting time while I can before the work starts up again - which is going to be fairly soon, as I still have vac homework to get done.

LDP
x


Sunday, 13 January 2013

The Day of the Grumpy Cat

I don't know about anyone else, but I really don't enjoy Sundays. Mondays, I can handle. But Sundays? No. It's a pretty serious dislike: if it were any more serious, there would be a Bob Geldof and the Boomtown Rats song about it. Every Sunday, I am inevitably miserable about something or another.

In honour of this week's unhappy Sunday, I made myself a Grumpy Cat brooch, based on the meme.


He's pretty simple, made from felt and a little brooch pin. If you want to make your own, here's how:

You'll need:
  • Felt in various colours
  • A brooch pin
How to do it:
  1. Cut out your pieces of felt (I cut up a picture of Mr Grumpy Cat himself as a pattern).
  2. Use a bit of glue to attach your ears to the head pieces. Secure with a few stitches.
  3. Glue down your eye pieces and muzzle piece, then secure with stitches.
  4. Sew on two tiny blue felt pieces for eyes, then stitch on pupils, and a nose and very grumpy mouth.

    Set the face aside for now.
  5. Sew the legs onto the front of the body.
  6. Sew the brooch pin onto the back of the body, and sew the two body pieces together, adding stuffing.
  7. Sew the two head pieces together, through the neck area, securing the head to the body. Add stuffing and close the head.
And then, your grumpy cat brooch is all ready to wear!

If you want to see it elsewhere, this tutorial is also available here on Cut Out + Keep.


Happy grouching. :)