Sunday, 5 January 2014

DIY: Grumpy Cat Bauble Ornament

Yes, yet another Grumpy Cat project. Although I’ve already made a Grumpy Cat brooch, as well as a Grumpy Cat Christmas sweater, I thought another project to protest festive cheer would be great to remove any remaining joy from the Christmas decorating.  If you want to ensure that your festive season is the grumpiest ever, or even just want to have a year-round reminder of Tardar Sauce’s eternal grumpiness, revamp a boring bauble to look like the internet’s favourite Grumpy Cat.

What you’ll need:
·         An old, plain round bauble ornament
·         Air-drying clay (I used paper clay)
·         Acrylic paints
·         A small scrap of white chenille wool
·         Miniature white pompom
What to do:

1.       Shape an ear, muzzle and Santa hat onto your bauble using the clay. Make the clay as flat as possible against the round surface of the bauble. Allow the clay to dry on the bauble, and once dry, slide the pieces off and re-attach them using some tacky glue.
2.       Paint your bauble a beige/cream colour, and paint the ear brown and hat red. Paint the muzzle area white.
3.       Using a photo of Grumpy Cat as a reference, paint the eye patches, eyes, nose and mouth.
4.       Glue a small piece chenille wool around the base of the Santa hat, and add the pompom to the tip of the hat.


And you’re done! Simply hang your grumpy ornament wherever you think it will remove the most joy and cheer. 


This project is also posted over on Cut Out+ Keep

Thanks for reading!

LDP x

Saturday, 4 January 2014

DIY: Grumpy Cat Christmas Sweater

For most, Christmas is a joyful season, filled with, I don't know, joyful stuff. However, for others, Christmas carols and flashing fairy lights fast become hard to tolerate, with fruitcake leaving only a sour taste in one's mouth. If you're one of the latter, spread your disdain for the season by coming as close to Christmas spirit as you dare and donning a traditionally ugly Christmas sweater, featuring the face of the internet's beloved Grumpy Cat. Perfect for glaring at Mariah Carey-blaring speakers in.

What you'll need:
  • Felt in Grumpy Cat-esque shades (cream, dark brown, white, light blue, and a tiny scrap of pink)
  • A small scrap of white fleece
  • An old sweater that you're willing to sacrifice for your hatred of the season
What to do:

  1. Cut out the basic shape of the face from cream felt and the shape of the eye patches from brown felt. Sew the eye patches onto the face.
  2. Cut out the muzzle area from white felt and stitch it onto the face.
  3. Cut out the nose from pink felt. Attach onto muzzle.
  4. Cut out two eyes from light blue felt and stitch onto the face.
  5. Stitch on two black felt pupils and stitch a grumpy mouth with pink cotton.
  6. Cut out an ear from brown felt and stitch it onto the head.

  7. Cut out a red hat shape and stitch it onto the other side of the head. Add an extra flap to the top of the hat to create the point.
  8. Stitch on a strip of white fleece to the bottom of the Santa hat.
  9. Cut out a circle of white fleece and sew tacking stitches around the edge.
  10. Pull the tacking stitches tight to create a more spherical shape.
  11. Attach to point of Santa hat.
  12. Sew your Grumpy Cat onto your old sweater and spread the disdain for the season!


As usual, this project is also posted over on Cut Out + Keep.

Hope you've all had a fun festive season, and expect a few more Christmassy crafts over the next few days - starting the 2014 decorating early, remember? Nothing to do with my laziness about posting. Nothing at all. *mumbles*

LDP x

Saturday, 5 October 2013

Eraser Stamps

For a while now, I've wanted to create a shirt with a goldfish on it. I've thought long and hard about it, and I decided that I wanted a pattern made up of a number of goldfish. But how would I get all of the little goldfish the same? A stamp, of course! But where the hell do you get a goldfish stamp?
Well, if you're me, you make one.


After consulting my mother, in all of her infinite crafting wisdom gained from years of being an art teacher, she recommended that I craft a stamp from an eraser, as it was the simplest way of doing it. And, so, I did.
Here's how:

What you'll need:

  • Eraser
  • Cutting knife
What to do:


  1. Draw your desired image onto the eraser.
  2. Use the knife to cut the outline of your design into the eraser (vertically), and then cut into the eraser horizontally, cutting away the edges to leave only the design.
  3. Ensure that your edges are defined and that your shape is cut out properly.
  4. Use your new stamp to create your own designs.


This method of stamp-making should work for just about any design, so you can go wild with what you choose. Hopefully I'll get to use my goldfish stamp for the top I want to make soon, but unfortunately it's back to university after the weekend, so painting won't be happening in the next few weeks.

Thanks for reading, and let me know if you have a go at making your own stamps. 

LDP
x

Sunday, 29 September 2013

Mercat Brooch

A few months ago, I was browsing through the blog Tails of a Mermaid. Run by Natalie Roos, a fellow South African, it is testament to Natalie's obsessive love of good food, exciting lifestyles and, above all: cats.

As usual, The Muses tend to strike from the strangest of places, and I couldn't avoid the temptation to create something combining the title of her blog with her ailurophilia. And thus, the mercat brooch was born.


Here's how to make your own:

What you'll need:

  • Felt (scraps will be enough)
  • Acrylic and fabric paint
  • Brooch pin
What to do:


  1. Cut out two of your cat shapes and two of your tail shapes. I didn't make a pattern for this, as it's very simple - just cut out the basic outlines.
  2. Start painting your felt pieces. Be sure to concentrate more on the front, as the back won't be seen. Add the face detail to the cat body piece, and consider using metallic paint for the tail (I mixed light blue, light green and silver paint to get the colour for my tail).
  3. Add some glue to stick together the cat body piece and the tail piece. Repeat with back pieces. Add a line of small stitches to secure.
  4. Add a button (I used a starfish-shaped one) and some paws. Glue on, and secure with a few stitches.
  5. Attach the brooch pin to the back piece of the cat.
  6. Attach the two pieces together, using cotton that matches the pieces.

I mailed off this little kitty to Natalie as an early birthday present in July, and I think she liked it, which was a wonderful feeling. Somehow, giving away the things I make to people who appreciate them is a far better feeling than keeping them hoarded up in my cupboard back at home.


This project is also available over on Cut Out + Keep
I'd love to see your version of this project if you give it a go, so be sure to comment if you make one. :) 

Thanks for reading, and apologies for my irresponsible hiatus. 
LDP x


Tuesday, 23 July 2013

Stormtrooper Cut-Out Shirt

Just before our university vacation, I thought about making a Star Wars cut-out shirt of some sort - I wasn't sure what I wanted, but I thought that doing a Darth Vader cut-out on a black shirt and a Stormtrooper cut-out on a white shirt would be pretty cool. I didn't get around to the idea straight away because I had to finish my exams, and I had so many other crafty endeavours to pursue that is got a bit lost in my messy mind. I also didn't have any nice t-shirts I wanted to cut up, so I decided to leave the whole project for another time.

Now, my dad doesn't live in the same city as I do, but he always calls on the last day of my school or university holidays and asks if I'm ready and the general parent-y questionings. And somehow, every time, when he asks what I've been up to over my break, my usual answer is, "Well, not much for the last <length of entire holiday>, but today I started making-" and I proceed to ramble on about some craft or another that I've just fallen in love with. Over the last few holidays, I've tried my best to keep busy from the beginning, and although I did pretty well at crafting right from the beginning of my holiday this time, I knew I couldn't let the vac slip away before I'd finished this shirt I had stuck in my head.

I rifled through my craft cupboard (which is actually my normal cupboard, but it's just filled with craft supplies instead of things that would usually occupy a cupboard, such as clothing and sanity and such) and found an oversized t-shirt I'd bought forever ago with some craft or another in mind but never got around to using. I cut up the shirt a bit, removing the sleeves and neck to make it more comfortable. I stitched down the raw edges and used that as my shirt to do my Stormtrooper cut-out on.


What you need to make your own:

  • A white t-shirt
  • A pair of scissors
  • A printer or a good eye for drawing 
How to make it:

  1. Print out the template you want to use. I printed mine on two pieces and sellotaped them together. You can find the one I used here (though I take no credit for creating it - I just found it online).
  2. Cut the template to A4 size if necessary, and laminate it. Cut out the parts of the template that will be cut out on the shirt.
  3. Tape your laminated cut-out onto your shirt, and trace the cut-out areas with a tailor's pen.
  4. Cut out the traced template on the shirt.
And you're done! I found that I had to be very careful with which areas I cut out, so make sure the gaps you leave aren't too massive, or the soft t-shirting fabric will sag down when you wear it. 


This is a very simple but effective project, and I'd love to see if you make one of your own! Please leave a comment below and send me a picture if you do!

LDP 
x


Friday, 19 July 2013

Sheldon the Dinosaur Plush DIY

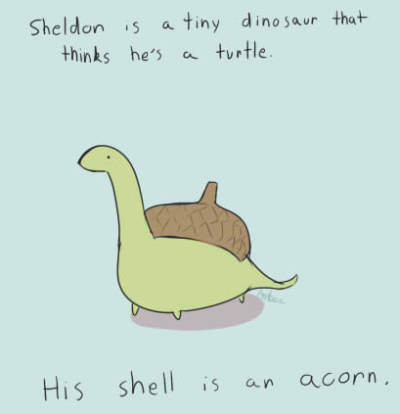
For about a year now, my friends and I have adored the Sheldon the Dinosaur comic by Amburgered. Sheldon is a tiny dinosaur who thinks that he is a turtle, and uses an acorn for a shell. Whenever I know one of my very close friends, Abi, is feeling down, I make a point of finding a recent Sheldon comic and sending it to her to cheer her up.

I decided that, because of this love Abi and I share for Sheldon, I ought to make Abi a little Sheldon of her own.

If you want to make your own, here's how to do it:
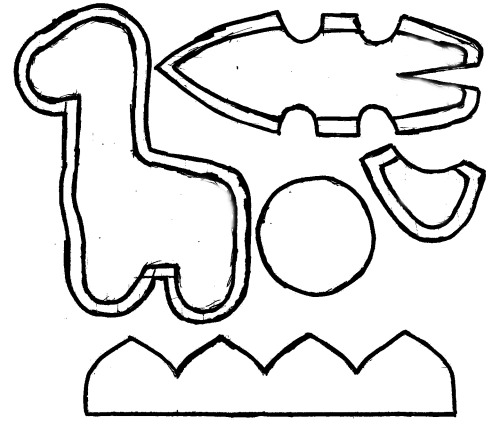
  1. Download the pattern here.
  2. Sew your four leg pieces to the leg holes on the inside body.
  3. Sew the dart at the back of the inside body.
  4. Sew the two outside body pieces to either side of the inside body piece.
  5. Sew around the neck and head area and at the back, bottom area, making sure to leave a space for turning and stuffing.
  6. Turn the body right-side out. Put the safety eyes in on the face and stuff. Close your stuffing hole.
  7. Cut out your upper shell pattern.
  8. Hand-stitch your shell (right sides together) as close to the edge as possible. Add in a small scrap of felt in the centre of the shell as the acorn stalk.
  9. Stitch the upper shell to the shell base and stuff it.
  10. Paint small Xs onto the shell.
  11. Stitch the complete shell to the back of the body.
  12. Take your own little Sheldon on adventures with you! 


I'd love to know if you also read the Sheldon comics, or see if you make a Sheldon of your own, so please leave your comments below!


Thanks for reading!
LDP x


Thursday, 18 July 2013

Humans vs Zombies Sock Bandolier

My university is hosting a game of Humans vs Zombies in August, and since I'm only in first year, this will be my first time playing the game. I'm resigned to the fact that I'm not athletic enough to survive very long, and our game won't be using guns, so balls of socks are the only way to ward off the zombies. I decided that the best way for me to survive would be to ensure that I have socks within reaching distance at all times for protection, so I figured that the best way to do that would be to make a sock bandolier.


Want to make your own? Here's how I did it:

What you'll need:

  • Nylon-like strap 
  • Elastic (mine was 2cm wide)
What to do:

  1. Start by deciding how long you want the strap to be by wrapping it around your body as you will wear it. Cut the strap and use a candle to burn the ends to stop fraying.
  2. Sellotape the two ends of your strap together.
  3. Stitch ends together and remove sellotape.
  4. Stitch ends together and remove sellotape.
  5. Mark along your strap and elastic where it will be stitched down. I marked my strap into 8cm spaces, with 1cm in between each space, and my elastic into 11cm spaces, also with 1cm between each space.
  6. Stitch down the elastic to the strap at each 1cm gap, forming loops for socks with the elastic.
  7. Stitch down a 13cm strip of elastic to the bottom of the strap in the centre of each 8cm space.
  8. Flip each strip up over the main elastic and stitch it into the centre.
Fill it up with socks and be prepared for the impending zombie apocalypse! 

I'm simultaneously nervous and overwhelmingly excited for this game of HvZ - as I said, it's my first time playing, but I've no doubt it will be awesome.


Let me know if you make your own sock bandolier, and if you've ever played HvZ before and if you have any tips for my first game!

Thanks for reading.LDP x