
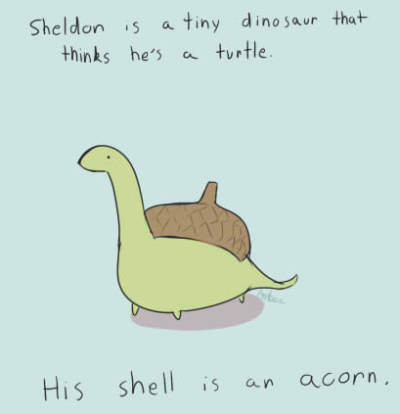
I decided that, because of this love Abi and I share for Sheldon, I ought to make Abi a little Sheldon of her own.

If you want to make your own, here's how to do it:
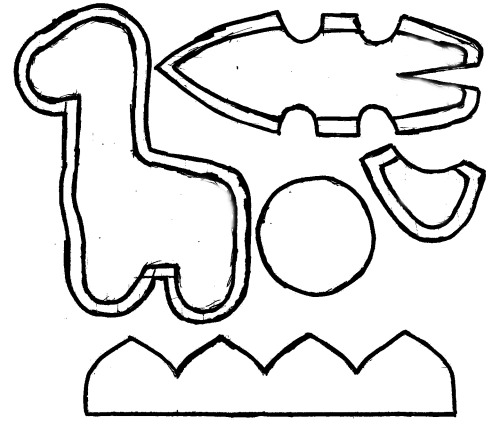
- Download the pattern here.
- Sew your four leg pieces to the leg holes on the inside body.
- Sew the dart at the back of the inside body.
- Sew the two outside body pieces to either side of the inside body piece.
- Sew around the neck and head area and at the back, bottom area, making sure to leave a space for turning and stuffing.
- Turn the body right-side out. Put the safety eyes in on the face and stuff. Close your stuffing hole.
- Cut out your upper shell pattern.
- Hand-stitch your shell (right sides together) as close to the edge as possible. Add in a small scrap of felt in the centre of the shell as the acorn stalk.
- Stitch the upper shell to the shell base and stuff it.
- Paint small Xs onto the shell.
- Stitch the complete shell to the back of the body.
- Take your own little Sheldon on adventures with you!

I'd love to know if you also read the Sheldon comics, or see if you make a Sheldon of your own, so please leave your comments below!

Thanks for reading!
LDP x
how cute is Sheldon! Thanks for sharing
ReplyDeleteadorable!!!
ReplyDeletecan you make a tutorial on how to make sheldon?
ReplyDeleteGreat work! Would you be able to upload a labelled version of the template though? I have no idea which pieces you're referring to in your instructions or how many of them I need to cut out!!!
ReplyDeleteIf I understand correctly: the circle and bottom most piece form the shell. You'll need two outer body pieces (top left), and 1 underbelly (top right). The remaining piece are the inner legs (x4), which attach to the underbelly and the outer body.
DeleteHi, I know that this is an old post but I need visuals. Could you make a video explaining that would be awesome. My sisters birthday is coming up and I would like to give her something hand made but I'm confussed. Thanks!
ReplyDeleteThis is so adorable!!
ReplyDelete